Build with Nacelle
Go Headless. Go Composable. Go Nacelle.
Nacelle is a commerce experience platform that fuels merchant growth by composing best-of-breed solutions and syndicating content and product data to multiple heads, endpoints, and channels. Nacelle is designed to empower brands with the flexibility and scalability necessary to thrive in the modern digital space. By decoupling the front-end presentation layer from the backend infrastructure, Nacelle enables businesses to deliver seamless, lightning-fast shopping experiences across various channels while flipping the traditional monolith inside out by ingesting data from individual best-of-breed systems so you can compose the commerce stack you want. With features like GraphQL APIs and robust integrations with leading e-commerce tools, Nacelle empowers brands to optimize performance, enhance customization, and streamline operations, ultimately driving increased conversions and customer satisfaction.
Architecture
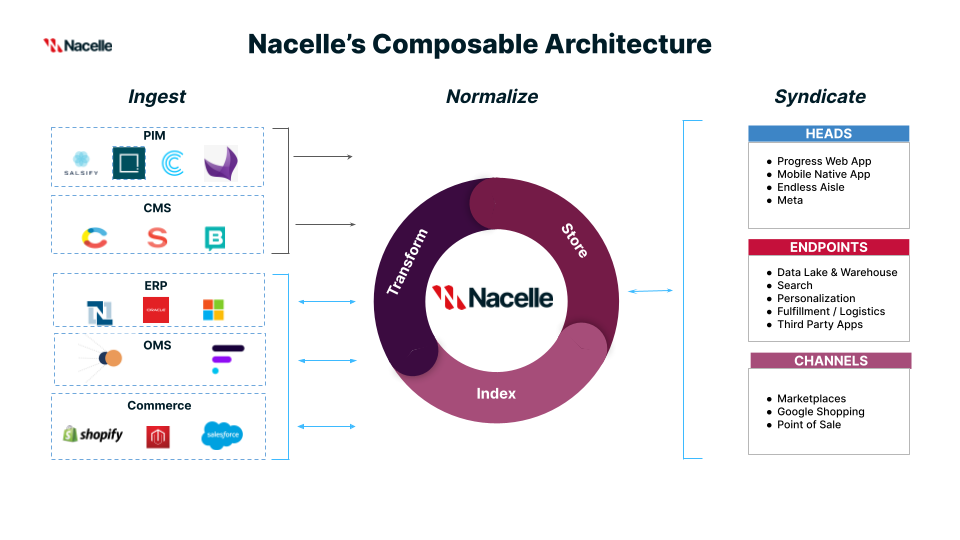
Nacelle accomplishes this with a three-tier architecture:

-
Ingest
Nacelle flips typical monolithic commerce tech stacks upside down by ingesting commerce data such as content, category, product, and inventory from best-of-breed solutions.Ingest data using our:
-
Normalize
Nacelle normalizes data in real time using its proprietary data orchestration layer. Our model is flexible enough to work with unstructured and transformed structured data.
Here’s how your data gets normalized:- Transform - We convert the raw, transformed, structured, or unstructured data into a standardized format that our system can easily process and utilize.
- Store - We then save this transformed data in a secure and accessible location within our application.
- Index - Last, we organize and catalog the stored data in a structured manner, typically using specific criteria or metadata, to facilitate efficient retrieval and querying of the data, enabling you to compose the commerce stack you want.
-
Syndicate
Nacelle syndicates storytelling content and product data to multiple heads, endpoints, and channels to make the data available and accessible for purposes such as marketing, analytics, or integration with other services. By syndicating data, we can ensure consistency and coherence across different touchpoints, enabling seamless experiences for users and optimizing business processes. Syndicate your data with one GraphQL API, and its supporting SDK and accelerators:- Using our Storefront GraphQL API
- To shopping interface heads using our SDK
- With our prebuilt head accelerators like Next.js and Nuxt.js
Designed for headless only
Unlike most commerce platforms designed nearly two decades ago, Nacelle can only run in a headless environment. When we set out to build Nacelle, we decided to commit fully to headless, and we burned the ships associated with the old monolith. Nacelle’s architecture is built specifically for and only for headless shopping experiences.
GraphQL first
We are fully committed to GraphQL because we believe it is the best solution for complex, headless composable architectures.
Composable 2.0
Most commerce platforms try to be everything to everyone, but Nacelle’s composable first technology flips the traditional monolithic inside out. It does this by ingesting data from individual best-of-breed systems, so you can compose the commerce stack you want – giving you the agility needed to build unique and dynamic shopping experiences while optimizing business operations for growth.
Anti-rip-and-replace
Instead of ripping and replacing your current technology, Nacelle binds with the technology you already have in place. It adds headless PWA capabilities while gradually letting you move backend operations to a new system in a piecemeal fashion. With this approach, you get quick time-to-value, reduce risk, and increase the overall ROI of your composable endeavor.
Updated 15 days ago
